Scuba Skills: How to Thread the Tank Strap Properly

When it comes to your scuba equipment assembly, there are many little details that need to be taken care of. Sometimes, tasks that seem simple at first, such as mounting your BC on a tank, may present a real challenge, especially if done for the first time.
If you think of purchasing the BC, most likely, the personnel at the dive center where you do that will show you how to thread the tank strap or even do it for you, however, you should definitely practice the process and learn how to string and adjust the tank strap yourself. Remember, if the strap is strung incorrectly or not tight enough, there is a chance your tank will slip out of the backpack when underwater.
So, let us start with a few general pointers. The tank strap that you will use to form a loop is secured to the backpack. One end has a large plastic buckle with a metal D-ring, attached to it and is around 6-10 inches (15-25 cm) long. The other end of the string is longer and has a hook-and-loop fastener. Usually, there is also a tag or a diagram somewhere next to the strap to lead you through the stringing process. Surely, not all buckles are exactly the same, but the basic procedure for stringing them is very similar and consists of a few simple steps.
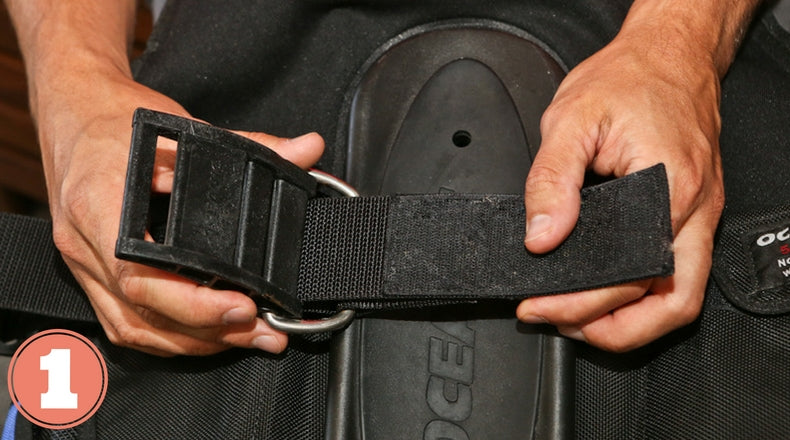
Step 1. Holding the free end of the strap in one hand and the buckle in the other, pass the free end through the D-ring opening below the buckle. Pull the free end through, leaving a loop approximately the size of a scuba tank. (Photo 1)
Step 2. Pull the free end of the strap through the middle slot on the buckle, keeping the tank loop formed during the first step. (Photo 2)

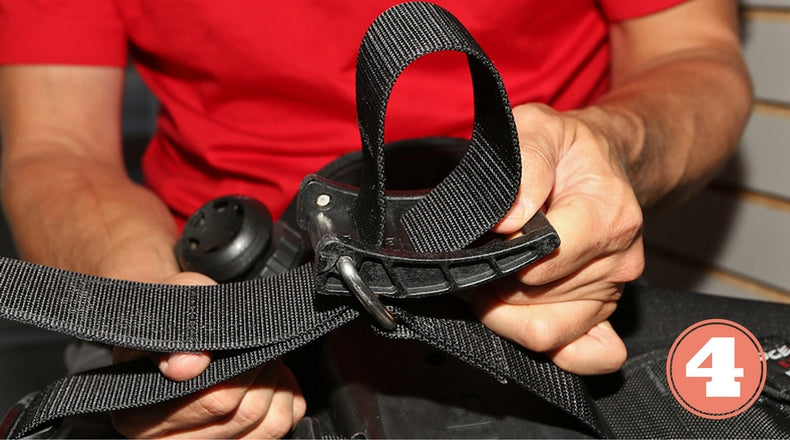
Step 3. String the open end of the strap through the slot closest to the cylinder and the D-ring. (Photo 3) If you have completed all three steps correctly, the slot on the opposite end from the D-ring will remain unused. (Photo 4)

Step 4. Place the cylinder in an upright position and lower the BCD tank strap over the cylinder until it’s at the proper height. (Photo 5)

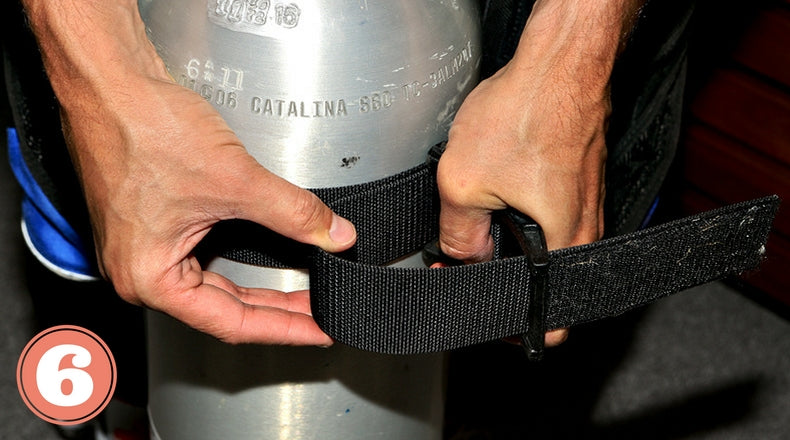
Step 5. Tighten the strap and thread the free end through the top slot (furthest from the D-ring) of the buckle. (Photo 6) Pull hard on the free end of the strap until the buckle snaps closed. (Photo 7)

Step 6. Pick up the BCD by its handle or the shoulder straps and make sure the tank is securely fastened and does not slip.
Helpful tip: you can wet the strap prior to slipping it over the tank, as the strap tends to stretch when in the water. This tip is especially useful if you have a brand new BCD or if the strap in your buoyancy compensator has become stiff from infrequent use.
In case you need to adjust the strap to fit a different sized tank, start by removing the strap from the end slot in order to make the process easier.
Then, if you need to make the tank loop smaller, simply push the necessary amount of strap from the tank loop back through the buckle and tighten the free end. In case you need a bigger loop, you’ll have to adjust the strap while mounting it on the BC. Place your tank in a vertical position and slide the strap over it. When it goes no further, force the buckle open and ratchet it a few times, at the same time exerting downward pressure on your BC. This will make the tank loop larger and the strap will slide down to the desired position. Finally, go over steps five and six described above.
Remember, even though the procedure, described here will apply to the majority of tank straps, there are buckles of a different type. So any time you work with the new BC, read the owner’s manual carefully and always double-check if the strap is strung correctly.